


Building a deck around a tree is a great way to have a living space close to nature. A deck by itself already works as an outdoor living space, but building a typical deck requires clearing the area of obstructions, including trees. However, you have the choice of building your deck around a tree if you want the shade provided by the foliage, or if you’re loath to cut down a perfectly good tree in order to build a deck.

The good news is that the process of building a deck around a tree is not much more complicated than building a typical backyard deck. However, you’ll definitely need to take the tree into account when planning on how you should build your deck, or if you should build it at all.
- I. Preparing for Building a Deck Around a Tree
- II. Tools for Building a Deck Around a Tree
- A. Protective Equipment
- B. Site Preparation
- C. Lumber and Lumber Cutting
- D. Building the Framing and Deck
- III. Decking Materials You Can Use
- IV. Designs for a Deck Around a Tree
- V. Building a Deck Around a Tree
- 1. Draw a Plan
- 2. Prepare the Site
- 3. Level the Concrete Blocks
- 4. Build the Frame
- 5. Reinforce the Frame
- 6. Build the Steps
- 9. Lay Down the Decking and Fascia Boards
- VI. Maintaining a Deck
Preparing for Building a Deck Around a Tree
As with any other home improvement project, building a deck takes a lot of planning and considerations. You’ll need to figure out things like the exact spot where you’ll be building the deck, the tools and materials you’ll use, your budget, the state of your house, and more. Taking care of a deck and maintaining it also takes a significant amount of effort, which is something you’ll need to take into account before you make a final decision.

Other than these, it’s also important to remember that wooden decks aren’t expected to last and be in good shape for more than a few decades. However, you can build a durable deck if you choose the right materials and take the right precautions.
What to Consider
If you’re thinking about building a deck around a tree, remembering that trees are living things is vital. You’ll also need to take into consideration the fact that many types of trees have extensive root systems, and that trees may be the hub of various insects and wildlife.
Roots
Whatever kind of tree you have in your yard, you’ll have to deal with its roots as you build your deck. Certain types of decks, especially those that are attached to houses, need footing holes that are dug into the ground and filled with cement and deck posts. Footing holes will likely damage the tree’s root system, and this is definitely something that you’ll have to keep in mind.
However, if you’ll be building a freestanding deck, you can use cement blocks instead of footings instead. The cement blocks will be laid right on the surface of the ground, with no need for digging.
Wood-Eating Insects
Wooden decks are always at the mercy of pests and wood-eating insects that can cause some damage. Termites, for example, can wreak havoc on wooden decks and should be kept at bay. What’s more, the damage done by these insects can be hidden under the surface, and sometimes you might not even be aware of what’s happening until it’s already too late.

Unfortunately, trees tend to attract a wide variety of insects, including the wood-eating kind. This can put your deck in danger of damage. However, this can be mitigated by using an insect-resistant coat for your deck. You’ll also need to make sure to have frequent inspections to catch any damage before it gets worse.
Water
Trees need water. As a general rule, they need about 10 gallons per inch of the tree’s diameter. You’ll need to think about how a deck might affect the amount of water that the tree gets.
Number of Trees
How many trees do you have in your yard, and how many do you plan to build a deck around? If your answer is “one,” then you’ve chosen the easiest (and probably best) option in this situation. Building a deck around one tree is much simpler than building around multiple trees. Additionally, there might even be a seedling or two among these trees that might burst forth eventually.
This isn’t to say that building around multiple trees isn’t doable. However, building around just one will probably make things easier for you down the line.
Deck Surface
Trees shed leaves, and depending on what type of tree you have, you might also have to deal with fruit falling to the surface of your deck. This won’t just litter your deck; fallen leaves and fruit can also make the deck surface slippery and potentially dangerous to walk on. If you want your deck to be right under the canopy of a tree, you’ll have to sweep and clear the surface regularly.
Building Codes, Permits, and Taxes

You may or may not need a permit to build a deck on your property. To be safe, it’s best to check the building code in your area before you even start planning and designing your deck. A good planner will take into account the time and money needed for the whole process of obtaining the necessary permits and paperwork.
Another thing you need to look into, other than building code and permits, is how your deck will affect the taxes you pay on your property. Will the deck be considered as an additional living space? Will this raise your taxes? If so, are you ready and willing to take that extra expense on?
Should You Build This Deck at All?
Of course, a deck wrapped around a tree is by no means essential and you’ll get by without it. However, it does have its benefits. You can lounge around under the shade of a nice tree, you won’t have to be fully under the sun, you won’t have to cut down the tree in order to build a deck, and your property value might go up as well.
Even so, a deck around a tree can be quite high-maintenance. Additionally, you might end up damaging the tree in the process of building the deck, or depriving it of water as time goes by. Thus, should you build this deck at all?
Ultimately, you’ll find the answer when you gain all the information you need and you’re able to weigh all your options and all the pros and cons. Hopefully, this article will be able to help you get at least a step closer to your final decision.
Tools for Building a Deck Around a Tree
Every project, no matter what it is, relies on the use of tools. Building a deck is no different. If you’re a consummate handyman and you’ve done projects like this before, you probably already have the tools in your garage or tool shed.

Concrete blocks like these are often used as alternatives to deck footings
The tools and materials in this list are meant for building a deck on concrete blocks. For decks that need footings, you’ll need the following:

- Posthole digger
- Post mix
- Gravel
- Concrete
- Concrete mixer
There still might be some more tools and equipment that you might be missing. If you don’t have an important tool, head on over to Engineer Warehouse. You’ll find a variety of high-quality, often innovative tools and equipment that can make various tasks easier for you to accomplish.
Protective Equipment

- Safety goggles
- Gloves
- Dust mask
Site Preparation
- Mallet
- Twine
- Tape measure
- Measuring wheel
- Spade
- Edger
- Wooden Pegs
- Spray paint
- Rake
- Gravel
- Concrete blocks
- Weed control fabric
- Lawnmower
- Builder’s square or angle finder
Lumber and Lumber Cutting

- Decking end grain protector
- Decking boards
- Beam
- Joists
- Decking boards
- Miter saw
- Jigsaw
- Pencil
- Sandpaper
- Paintbrush
Building the Framing and Deck

- Hand saw
- Corner brackets
- Joist hangers
- Fascia boards
- Palm nailer
- Clamp
- Drill
- Impact driver
- Socket set
- Pegs
- Spirit level or a laser level
- Coach screws
- Deck screws
- Combi square
- Sleepers
- Deck spacers
- Waterproofing membrane tape
Decking Materials You Can Use

You have a lot of choices of decking materials, and each one has its own pros and cons. Typically, deck boards are lumber, but you also have other options like wood alternatives or metal.
Before you make your choice, you’ll have to consider factors like insect resistance, appearance, durability, cost, and workability. Here are some decking material options that you might want to look into so you can make an informed choice:

Designs for a Deck Around a Tree
Decks typically have the same basic design. There’s a frame that needs to be well-built and structurally sound, and there’s a surface that you can stand, sit, and walk on. You can also put a railing around the perimeter of the surface, as well as add stairs if the height of the deck requires them.
The design of a deck built around a tree, however, differs slightly. The surface of the deck, as well as the framing underneath, needs to accommodate the trunk of the tree and leave an open space for it.
There are thus many designs that you can choose from, but the important thing is that the design you choose will accommodate the tree, avoid damaging it, and will also remain durable for a long time to come.
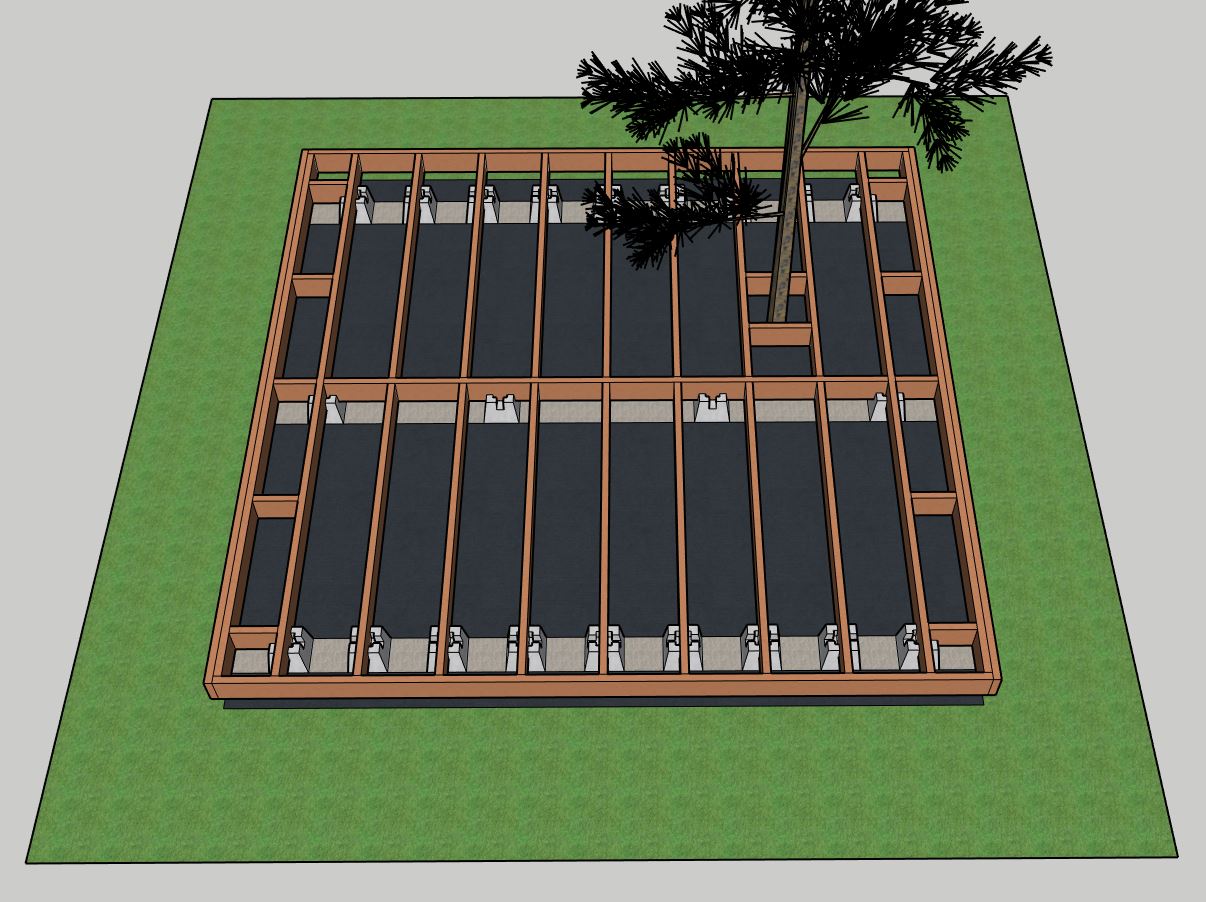
The Structure of a Deck Around a Tree

In general, you’ll make things a lot simpler for yourself if the site you choose for your deck is largely flat, with little to no slope. This isn’t to say that building a deck on a slope is difficult, or that it can’t be done. It will, however, take more calculations and more measurements if you do, as compared to building on a flat site.
In terms of building the frame, you’ll likely need to base the space between joists on the space needed to accommodate the tree. You’ll also need to make sure to leave a few inches to allow enough space for the tree’s further growth.
As mentioned above, decks might typically need footings and footing holes, but these holes might damage the tree’s root system. The deck-building guide below will be based on a design that uses concrete blocks as a foundation for a freestanding deck, instead of footing holes.

It’s important to remember that if your deck is attached to your house, it will need footing holes that will prevent frost heave. Thus, if damaging the tree’s root system is a huge possibility, you might want to consider building a freestanding deck on cement blocks instead. You can still position a freestanding deck right next to your house without actually attaching it to the house.
Building a Deck Around a Tree
Depending on your experience and level of skill, building a deck might take around a few weeks. The process of obtaining permits, drawing up plans, planning out your budget, and other preparations also take time, so planning and timing it all out is advisable.
The building process starts with drawing up a plan and ends with the finished project itself. It’s a long process and there are a lot of parts that need to be put together, but that’s what it takes to build a solid and durable deck.
The following is a guide to building a square or rectangular freestanding deck that uses concrete blocks instead of footings as a foundation. It is also low to the ground, with no need for balustrades.
1. Draw a Plan

The best place to start when drawing a plan is the site where you intend to build your deck. It’s there that you can begin to take measurements, such as the distance between your house wall and your back fence or property line. You’ll also be able to measure the circumference of the tree’s trunk, and you’ll be able to figure out the dimensions of the space you’ll leave for the tree.
If you’re taking measurements of straight lines in a level plane, you can use the Calculated Industries Digiroller Plus III 6575 or check out our list of the best measuring wheels on the market.
This is also a good time to double-check if the site you’ve chosen is level. You can use a spirit level or a laser level to confirm this.

Once you’ve got all the measurements down, you can start mapping out the site on paper and sketching how your deck will look. You can do two sketches: one that shows your deck from above, detailing the width and length as well as the dimensions of the space for the tree; another that shows side elevation and the layout of the frame.
These sketches should also include the measurements of the framing and deck surface, and you can also include things like the materials you’ll be using. If you have the technical know-how, you can come up with a scale drawing of the deck. This will give you a better idea of how the deck will eventually look.

2. Prepare the Site
Go out to the construction site and stick wooden pegs into the ground to mark the four corners of the deck. Take your twine, tie it to one peg, and stretch it around the perimeter of the deck so it’ll form a square or a rectangle. Make sure that each corner is at a 90-degree angle, which you can measure using a builder’s square or an angle finder.
Once you’ve determined the perimeter of the deck, cut out pieces of the sod within that perimeter. Make sure that you don’t dig too deeply; the area just needs to be free of grass, but still even.

Next, figure out where you’ll be placing the cement blocks. You can use spray paint to mark the spots on the ground where the cement blocks are supposed to go.
3. Level the Concrete Blocks
Place the cement blocks that should line one of the outer sides of the deck. Place a joist securely in the grooves. Take your spirit level or laser level to see how level the joist is. It’s important to make sure that this and all the subsequent joists are level so you won’t have a deck that’s sloping or sagging in places.

If the blocks themselves are not level, you can dig holes for the blocks in order to make everything level. Repeat this process for the rest of the cement blocks.
At this point, you can lay down your weed control fabric. Since you’ll have cement blocks all over the area of the deck, you might have to cut holes into the fabric to accommodate them as well as the tree. You can also cut the fabric in strips if that will be easier. You’ll then need to cover the fabric entirely with gravel.
4. Build the Frame
Building this frame is straightforward from this point. You can start by placing two joists into the outermost blocks on the two ends of the deck; make sure that each one is level. Once these are in place, you can start installing the rim joists. You can use cement or wood blocks to hold the rim joists up, but make sure that these boosts are level.

After you secure the rim joists, place the beam in the middle row of concrete blocks. You can now start installing the inner joists.

To do this, mark the spots where the joists will go on the rim joists, as well as both sides of the beam. It should be noted that the spacing of the joist hangers -- and, therefore, the inner joists themselves -- should depend on the placing of the blocks near the rim joists. The inner joists will rest on these blocks as well; thus, the blocks and the joist hangers should all be aligned.
Once the spacing has been established, attach joist hangers to the beams, at the exact spot where the joists should go. To make sure that the joists will fit snugly into the joist hangers, use a piece of wood cut from a joist to make sure that the joist hanger jaws are spaced correctly.

Now, go to the rim joists and do the same. Once all the joist hangers have been installed, it’s time to place the joists as well. You’ll have to place two sets of inner joists, one set on either side of the beam.
At this point, you’ll notice that two sides of the frame are still missing end joists. This is the time to install them. They’ll go right over the ends of the two other rim joists, thus completing the frame.
5. Reinforce the Frame

Doubled-up end joists
The end joists also need to be doubled up for extra stability. Install another joist on the inner sides of the end joists. Then, you’ll need to install sleepers along the side of the doubled-up end joists. These sleepers will provide the frame with more support.
You can now also install the sleepers that should go on the two sides of the tree. Use joist hangers to install these sleepers, since that will guarantee better support as well.
Now, take corner brackets and install them on the inside corners of the frame. You can screw the brackets in, or use a palm nailer to make the installation easier.
6. Build the Steps
This deck won’t be too high up the ground, but it will be just high enough that a step will be beneficial. There’s no need to build stairs with the stringers, toe kicks, and treads; a simple step will definitely suffice.
To do this, you can build a long box reinforced with sleepers out of pressure-treated lumber that’s rated for ground contact. Using this type of lumber exactly is important because it’s made to be safely laid on the ground without the danger of immediate rot. See the figure below for a better idea of what the box should look like:

Simply lay two of these boxes down so that they’re hugging a corner of the deck. Use your spirit level to make sure that the two boxes are level on both horizontal axes.
Clamp the two boxes at the corner, then screw them to the deck frame and each other with deck screws. This will securely attach the steps to the deck itself.
This is also the time to apply waterproofing membrane tape over the top of all pieces of wood used in the frame. Waterproofing is important, especially since this deck will be exposed to the elements.
7. Lay Down the Decking and Fascia Boards

Once the waterproofing is done, it’s time to lay down the deck boards and attach them to the framing with deck screws. It’s also important to remember that you’ll need to keep the space for the tree open. Thus, you’ll have to cut a few decking boards to accommodate this space. A few decking boards will be shorter, while others will need to have a section cut out of them so they won’t obstruct the space for the tree.

When laying the decking boards, make sure to use deck spacers in between each board before fastening it down. These spacers will help make sure that all the boards are aligned correctly and spaced evenly.
Install decking boards on the steps as well.

Once the decking boards have all been installed and secured, you can start to attach the fascia boards. These fascia boards aren’t actually essential, especially to the structural integrity and strength of the deck itself. However, fascia boards will make the deck more aesthetically pleasing, especially if they’re made of the same material and have the same coloring as the decking boards. For consistency, you can put fascia boards on the inside of the tree’s space as well.

Maintaining a Deck

A deck around a tree can be extremely nice to hang out at, especially when it’s nice out and the weather is agreeable. However, as with most decks, this one needs a lot of maintenance as well. It also has the added dimension of being built around a tree, which is a living thing that can undergo changes that can affect the deck as well.
One thing you’ll have to do regularly is to keep the deck surface clean of leaves or fallen fruit, which can pose slipping hazards. Another important thing to do is to have regular deck inspections, which can help figure out problems and issues before they get too bad.
With the right tools, materials, and maintenance practices, this deck can be something enjoyable that can last for years to come.


